Tuesday 15 May 2012

Replaying

Quick note: There was a disaster with boxSlide, in which I lost all of the files. I was incredibly dismayed by it, but I can't hang onto it forever, I guess.

Anyway, since that, I've been going back to basics and learning new things. I'm going to write about one of the fun things I've been doing recently:

For boxSlide, one of my main advertising points was the ability to watch a replay of the level. Now, you may think that creating a replay of someone's actions could be quite difficult - perhaps because you're thinking it's something to do with saving actual footage of the event. There is a much more logical way around this.
Basically, you store keystroke data. This means that when the player presses a certain key on the keyboard, this data is logged (I use an array to store this data). Here's an example:

-----------------------------------------------------------------------------------

var keyInput:Array = new Array();

stage.addEventListener(KeyboardEvent.KEY_DOWN, keyPressed);

function keyPressed(Event:KeyboardEvent):void{
        if(Event.keyCode == 37){
                keyInput.push("left");
                trace(keyInput);  
        }else if(Event.keyCode == 39){
                keyInput.push("right");
                trace(keyInput);   
        } else if(Event.keyCode == 38){
                keyInput.push("up");
                trace(keyInput);   
        } else if(Event.keyCode == 40){
                keyInput.push("down");
                trace(keyInput);   
        }
}

-----------------------------------------------------------------------------------

This code would simply add either "left", "right", "up" or "down" depending on what key is pressed to the array, and then the array is traced (similar to printing in other languages). However, this isn't very effective, as if you hold down any of the keys, the corresponding value is constantly pushed into the array. For instance, if I held down the left array key for an extended amount of time, I'd find the array to look like this:

left,left,left,left,left,left,left,left,left etc.

To counter this, you can add a simple if condition:

-----------------------------------------------------------------------------------

var keyInput:Array = new Array();

stage.addEventListener(KeyboardEvent.KEY_DOWN, keyPressed);

function keyPressed(Event:KeyboardEvent):void{
        if(Event.keyCode == 37){
                if(keyInput.length - 1 != "left"){
                        keyInput.push("left");
                        trace(keyInput);
                }  
        }else if(Event.keyCode == 39){
                if(keyInput.length - 1 != "right"){
                        keyInput.push("right");
                        trace(keyInput);
                }  
        } else if(Event.keyCode == 38){
                if(keyInput.length - 1 != "up"){
                        keyInput.push("up");
                        trace(keyInput);
                }  
        } else if(Event.keyCode == 40){
                if(keyInput.length - 1 != "down"){
                        keyInput.push("down");
                        trace(keyInput);
                }  
        }
}

-----------------------------------------------------------------------------------

The new if condition is basically asking if the last value in the array is not the same as the one we're trying to add, then allow it to be added. Also, a quick note: You may be wondering why it's "keyInput.length - 1" as opposed to "keyInput.length". This is because an array starts at 0 instead of 1. However, by having a value in keyInput[0], the array's length is 1. Therefore, we must take one off.
Now, this method is all well and dandy for games such as boxSlide, as timing did not matter. However, in the prototype I've been creating recently, timing WAS important. Therefore, I created a timer, and at every key press, I also logged what time it was done. For instance:

-----------------------------------------------------------------------------------

var keyInput:Array = new Array(),  timeInput:Array = new Array();
var timer:Timer = new Timer(1000);
var time:int = 0;

stage.addEventListener(KeyboardEvent.KEY_DOWN, keyPressed);
timer.addEventListener(TimerEvent.TIMER, gameTimer);


function gameTimer(e:TimerEvent):void{
        time++;
}
timer.start();

function keyPressed(Event:KeyboardEvent):void{
        if(Event.keyCode == 37){
                if(keyInput.length - 1 != "left"){
                        keyInput.push("left");
                        timeInput.push(time);
                }  
        }else if(Event.keyCode == 39){
                if(keyInput.length - 1 != "right"){
                        keyInput.push("right");
                        timeInput.push(time);
                }  
        } else if(Event.keyCode == 38){
                if(keyInput.length - 1 != "up"){
                        keyInput.push("up");
                        timeInput.push(time);
                }  
        } else if(Event.keyCode == 40){
                if(keyInput.length - 1 != "down"){
                        keyInput.push("down");
                        timeInput.push(time);
                }  
        }
}

-----------------------------------------------------------------------------------

In this part, I created an event timer (although, I could've used a simple setInterval - I dislike using these however, as you can't stop and start them, whereas with an event timer you can), and then every time the counter "ticked", the integer time increased by 1. I then pushed the time's value into the timeInput array every time a key was pressed. Pretty simple stuff.
Now that that is done, you can use this information and translate it into some visual feedback. Here's an example of my prototype in action (bear in mind it has other things added to it like colour transformations):

REPLAY GAME

Instructions: Use the left and right arrow keys to control the box. Avoid the obstacles, and make it to the right side of the game screen. As of now, there's no true objective/point for there being a replay, however, I do have plans for this.

Basically all I wanted to say! I found it rather interesting to make. Feedback would be nice. :)

Monday 16 April 2012

boxSlide!

Wow, people actually asked for an update. Well, as you can tell by the header, I've been working on a game. I've been primarily doing it with Rojoco. It's a large project, but it's nearing its completion - all we're doing now is packing in more and more content. =)

The main concept of the game is quite simple. Use the arrow keys to slide around on the ice. You can only change direction if you stop moving, i.e. hit an object. Think Pokemon ice puzzles. To beat a level, you have to reach the checkered tile. Sounds simple, but there are lots of different mechanics to increase the difficulty (as seen in the header).

Along with the levels that are still being produced (there will be 40 in total), there's a level editor. This is what we use to produce the levels, and it's incredibly easy to use.

There are lots of other cool things that we're including, since we want this game to be packed with content. Since I don't have much time at the moment, this is just an extremely brief overview of the last few months' efforts. In the next post I'll get some preview images out and be a little more in depth about each mechanic. But for now, you can try and work things out from the header. Thanks!

Saturday 28 January 2012

Game Update

Well, last time you saw my progress on a map editor. Well, I've been using that editor and creating a bunch of maps with it. Now, these maps would be pretty pointless, unless I had something that used that map data...

Introducing... LOOTURE!

This is the first sighting of my game engine! The engine runs similar to the original Zelda - you can move around the map using the arrow keys. When you reach the edge of a map, you move onto the next map. There's a lot more to it than that, obviously.

I'm going to try and give updates on this thing as a lot of work has already been put into it. I'd like a lot of it to be kept secret for a while, though. =P

GAME UPDATES:

  • Created the game engine (map changing, collision detection etc.)
  • Added a bunch of new sprites (such as the hedge sprites)
  • Added a playable character

Like I said, there's a lot more than that. I just want to keep it secret until a future update. See ya!

Saturday 14 January 2012

What I've been up to!

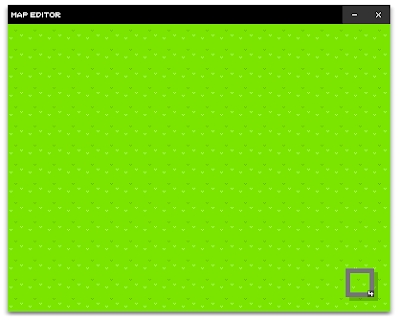
Not made a post in a while. Ah well. Recently, I've been rather busy with school, but I've been working on a big project (which I've been steadily progressing with, thanks to a little schedule). I'm going to show off the editor I created for the project, as the project will use lots and lots of map codes to produce one big world:

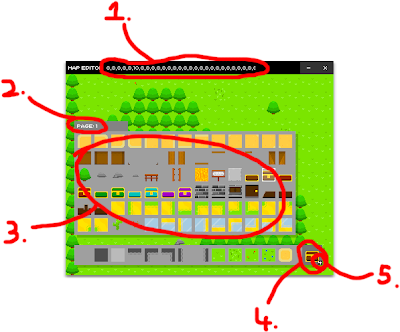
This is the first thing you see when you start up the editor. It produces a 20x15 tile area (each tile is 20x20 pixels). The default map is just a large grass area. Now, the diagram below shows all of the mechanisms I've implemented into the editor to make it easy for me:


1. This is a small snippet of the level code of the map displayed under the tile selector. The actual level code is 1200 numbers long.

2. This is the page number of the tile selector. I can navigate through the pages by using the left and right arrow keys, or I can scroll through each tile to eventually reach the next page by using the mouse wheel.

3. This is the tile selector displaying page 1 of the tiles. There's 78 tiles per page (plus the 13 tiles on that little bottom bar). To hide the tile selector, I have to move my mouse over the little bottom bar, and to show it, I simply scroll using the mouse wheel.

4. This is the currently selected tile. This helps when I haven't got the tile selector visible. If I move my mouse over it, it moves to the top left hand corner so I can get underneath it.

5. This is the layer number. The layer numbers go from 4-1 (4 being the bottom layer, 1 being the top).

---

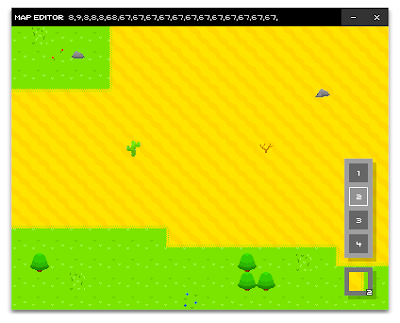
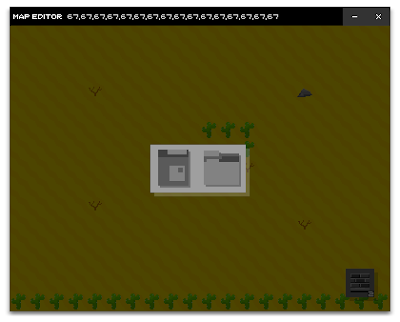
Here are a few more screenshots, showing the layers panel and the saving and loading screen:

I right-click to bring up the layers panel. I then scroll through the layers with the mouse wheel.

I hit the escape key to bring up the editor menu. I click either save or load - save allows me to create a new .txt file which then has the level code pasted into it, and load allows me to open up a .txt file that the editor then reads and displays accordingly.

---

That's basically it! Well, I've been creating lots of maps using the editor, but that's all. I also started work on the actual game engine, but I've left that for now; doesn't need doing right this minute. Happy new year!