Wednesday, 29 December 2010

Poster Finished!

It's all done!


:P

Mostly drawn in Flash. The little effects, text and frame were done in Photoshop!

Poster Drawing!

I've been drawing myself a poster to hang on my wall! So far, the poster has been going well. I've been drawing the whole thing in Flash so far; no Photoshop yet.

It's not finished as of now, but I have a few images of the stages that took place:


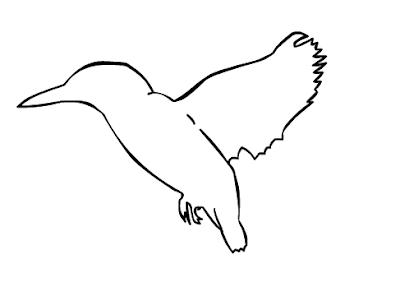
This first one is just the basic outline of the bird I was drawing for the poster (Kingfisher).
Here, we have the finished outline for the bird. Looks quite nice. =)
Now my friend has basic colours! No lighting yet, however, as the image was going to become
complicated...

Tuesday, 28 December 2010

New mic!

Hell yes! I bought a decent microphone (on a headset) so I can do some decent videos! Should be fun. =)

Saturday, 25 December 2010

Wednesday, 22 December 2010

What's to come!

Hey, in this post, I'm going to be describing what's to come in the future! Or what I hope, anyway.

But first, I want to show off a little project of mine. :P


I spent about 1 hour making the basic thing, then another hour bug fixing and adding stuff. Basically, it's a little AIR app that stores little notes, then saves it all to an array. Only 5 notes can be shown at a time, though. The thing also folds away neatly (with animation). That "X" button isn't actually to close the app; it's to shrink it. This is so if there is something behind my arrow, I can get to it.

WHAT'S TO COME IN THE FUTURE

Ok, the main article. As you can see, I've already started doing tutorials. I'd like to continue doing this, as I enjoy it. I'll try and make them all code based as well, so you don't have to download anything. However, I'll be sticking to AS3 only - no AS2.

I'm also hoping to do videos. I've found a way to make recordings smooth, so I can do a number of things. I've always wanted to do Let's Plays - they sound quite fun! I'll only be doing Flash games, mind.

Games wise? Well, I have stuff in the works, but I'm not promising completion. ;)

Tuesday, 14 December 2010

Tutorial 1: Drawing App in AS3 - part 2; rubbers!

Hey again! Yesterday I posted a pretty simple tutorial on making a simple drawing application. Today, as I said before, I'm going to do the rubber!

Ok, the rubber is nothing special. For simplicity, I'm just going to make it a white, thick line (my background is white, so it'll give the effect of it being a rubber). I'll also provide code for a complete eraser!

First off, I'm going to paste last tutorial's code in, so you know where we're starting from!

var startDraw:Boolean = false;
var drawWidth:Number = 20;

stage.addEventListener(MouseEvent.MOUSE_DOWN, startDrawing);
stage.addEventListener(MouseEvent.MOUSE_UP, stopDrawing);
stage.addEventListener(Event.ENTER_FRAME, checkDraw);

function startDrawing(e:MouseEvent):void{
graphics.moveTo(mouseX, mouseY);
startDraw = true;
}
function stopDrawing(e:MouseEvent):void{
startDraw = false;
}
function checkDraw(e:Event):void{
if(startDraw == true){
graphics.lineStyle(drawWidth, 0x000000);
graphics.lineTo(mouseX, mouseY);
}
}

Yum. Now, we need to add a new variable to check whether the rubber is active... OR NOT?! Simply add this to the code, ideally where your variables are defined:

var rubber:Boolean = false;

Yay. Anyway, we now have to decide how you want to access this sexy rubber of yours. Just to add a little spice to this, we're going to use the keyboard to access the rubber. So, let's add two new event listeners!

stage.addEventListener(KeyboardEvent.KEY_DOWN, startRubber);
stage.addEventListener(KeyboardEvent.KEY_UP, stopRubber);

Oh baby. I defined two event listeners (and attached them to the stage), one for when a key on the keyboard is pressed down, and the other for when it is released. In other words, you have to hold down a keyboard key to access the rubber! Now we need to get the functions for these two rolling. For this example, I'm going to be using the space bar to access the rubber, which is keycode 32!

function startRubber(Event:KeyboardEvent):void{
if(Event.keyCode == 32){
rubber = true;
}
}
function stopRubber(Event:KeyboardEvent):void{
if(Event.keyCode == 32){
rubber = false;
}
}

Just like with the mouse functions, we have one for true, and one for false! Now, instead of creating a new event listener to check the rubber, we can just use the same one we used for the mouse. Simply edit the checkDraw function as follows:

function checkDraw(e:Event):void{
if(startDraw == true){
if(rubber == false){
graphics.lineStyle(drawWidth, 0x000000);
graphics.lineTo(mouseX, mouseY);
}else if(rubber == true){
graphics.lineStyle(drawWidth, 0xFFFFFF);
graphics.lineTo(mouseX, mouseY);
}
}
}

As you can see, the app now checks whether the rubber is true or false once the user starts to draw! If it's false, you draw as normal, else if it's true, the colour of the line changes to white (0xFFFFFF) and draws the new line. That's everything for the simple rubber!

Now, as I said before, I'd also give you a choice of removing everything. For this, you can change the checkDraw function back to what it was, remove the stopRubber function and event listener and take away the rubber variable. Instead, we only need to have one simple line of code in the startRubber function:

graphics.clear();

Here's the code with everything else with it:

var startDraw:Boolean = false;
var drawWidth:Number = 20;

stage.addEventListener(MouseEvent.MOUSE_DOWN, startDrawing);
stage.addEventListener(MouseEvent.MOUSE_UP, stopDrawing);
stage.addEventListener(KeyboardEvent.KEY_DOWN, startRubber);
stage.addEventListener(Event.ENTER_FRAME, checkDraw);

function startDrawing(e:MouseEvent):void{
graphics.moveTo(mouseX, mouseY);
startDraw = true;
}
function stopDrawing(e:MouseEvent):void{
startDraw = false;
}
function startRubber(Event:KeyboardEvent):void{
if(Event.keyCode == 32){
graphics.clear();
}
}
function checkDraw(e:Event):void{
if(startDraw == true){
graphics.lineStyle(drawWidth, 0x000000);
graphics.lineTo(mouseX, mouseY);
}
}

And here's the code for the white line rubber:

var startDraw:Boolean = false;
var rubber:Boolean = false;
var drawWidth:Number = 20;

stage.addEventListener(MouseEvent.MOUSE_DOWN, startDrawing);
stage.addEventListener(MouseEvent.MOUSE_UP, stopDrawing);
stage.addEventListener(KeyboardEvent.KEY_DOWN, startRubber);
stage.addEventListener(KeyboardEvent.KEY_UP, stopRubber);
stage.addEventListener(Event.ENTER_FRAME, checkDraw);

function startDrawing(e:MouseEvent):void{
graphics.moveTo(mouseX, mouseY);
startDraw = true;
}
function stopDrawing(e:MouseEvent):void{
startDraw = false;
}
function startRubber(Event:KeyboardEvent):void{
if(Event.keyCode == 32){
rubber = true;
}
}
function stopRubber(Event:KeyboardEvent):void{
if(Event.keyCode == 32){
rubber = false;
}
}
function checkDraw(e:Event):void{
if(startDraw == true){
if(rubber == false){
graphics.lineStyle(drawWidth, 0x000000);
graphics.lineTo(mouseX, mouseY);
}else if(rubber == true){
graphics.lineStyle(drawWidth, 0xFFFFFF);
graphics.lineTo(mouseX, mouseY);
}
}
}

Well, thanks for reading! Just like last time, if you have any questions, ask it in the comments section. Next time... we'll add colour! Bye!
Monday, 13 December 2010

Tutorial 1: Drawing App in AS3

Ok, so I fancied sharing a tutorial with you guys. I completely wrote the code myself today out of sheer boredom (messing around, as well). So without further ado:

Ok, what we will be covering:

* Drawing a line by click and drag (with extra effects for people who want to step it up a notch)
* Changing the colour of the line you're drawing
* Adding a "rubber" (either a white line or a complete erase)

I'd say this tutorial is intermediate, so not terribly difficult. We will start by creating some variables (code will be bold and in italics):

var startDraw:Boolean = false;
var drawWidth:Number = 20;

The first variable here defines when we're drawing (as it's false, we're not). The second defines how wide the line we draw will be.

Next, we need to add some event listeners! To draw this line, we will need 3. One for when the left mouse button is pressed DOWN, another for when it's RELEASED and a final one to check it all over. Add this underneath the previous code:

stage.addEventListener(MouseEvent.MOUSE_DOWN, startDrawing);
stage.addEventListener(MouseEvent.MOUSE_UP, stopDrawing);
stage.addEventListener(Event.ENTER_FRAME, checkDraw);

Yum. As this first part isn't involving any extra effects, attaching all event listeners to the stage is fine. Ok, now we will define the first function:

function startDrawing(e:MouseEvent):void{
graphics.moveTo(mouseX, mouseY);
startDraw = true;
}

Great! here, we set where the line graphics will... well... move to! We obviously want it to follow the mouse, so we defined the X and Y to both follow the mouse. Also, we make sure startDraw is true, for the checkDraw function. Next:

function stopDrawing(e:MouseEvent):void{
startDraw = false;
}

Now test it! You'll be glad to know NOTHING HAPPENS YET BECAUSE WE HAVEN'T DONE THE CHECKDRAW FUNCTION. If you actually checked... you're dopey. Anyway, this one's pretty self explanitory - just changes the startDraw boolean back to false. Now, the sexy function we've all been waiting for:

function checkDraw(e:Event):void{
if(startDraw == true){
graphics.lineStyle(drawWidth, 0x000000);
graphics.lineTo(mouseX, mouseY);
}
}

Ok, this is the good bit! To begin with, we've made it so the code only works if startDraw is true (that's where the past functions come into play). The actual code is pretty simple. the lineStyle is how your line looks, feels... LIVES (lulz). The first variable contained within the brackets is the lineWidth we defined at the beginning, the second variable is our line colour! I've simply set it to black so there's no confusion. The next bit is simply where our line goes to, which is going to be the mouse again - so mouseX, mouseY!

Ok, now it should all work. Hit ctrl + enter to export yo' SWF. If something's not working, copy and paste this final code in:

var startDraw:Boolean = false;
var drawWidth:Number = 20;

stage.addEventListener(MouseEvent.MOUSE_DOWN, startDrawing);
stage.addEventListener(MouseEvent.MOUSE_UP, stopDrawing);
stage.addEventListener(Event.ENTER_FRAME, checkDraw);

function startDrawing(e:MouseEvent):void{
graphics.moveTo(mouseX, mouseY);
startDraw = true;
}
function stopDrawing(e:MouseEvent):void{
startDraw = false;
}
function checkDraw(e:Event):void{
if(startDraw == true){
graphics.lineStyle(drawWidth, 0x000000);
graphics.lineTo(mouseX, mouseY);
}
}

Und voila! You've got a sexy-ass (but I admit, simple) drawing app! You can change the width of the line by changing the drawWidth variable to to a lower number. If you have any problems, post a comment!

Until next time (I'll do the rubber then), bah bye!

Saturday, 4 December 2010

Delay?

The game is finished and has been fully beta-tested, but there most probably will be a delay in release.

Why?

Well, instead of just making a webs page, I'm actually submitting this game to Mochimedia, to obtain ad revenue and allow an highscore system. The game will then be distributed by Mochimedia to other leading websites.

Revenue percentages will be divided fairly between Poi and I (Poi did the music, so he's entitled to some of it).

Stay tuned!

Beta-testing!

The game is now in Beta! A number of glitches have been discovered and eradicated. One of which stopped me from getting an achievement... *grumble*

Just need sound!

Everything in the game is now complete... almost. There's just sound to add now. I've kindly asked Poison to provide some music for the game (and I do believe he accepted <.<).
After the sound has been put in, Sobchak and Captin will beta test it, searching for glitches and giving improvements.

You guys can play the game after that. =D


Here's the main menu of the game, now with the title revealed! The instructions and achievements are built into the game, this time. :3

Friday, 3 December 2010

New game?!

A new Christmas game will be coming out on the 5th! Stay tuned!